

How To Access Snipping Tool On Windows 10
Like Windows 7 and Windows 8, Windows 11/10, and Windows 11 too include the Sn ipping Tool, which lets you take screenshots on Windows 11/10 computers. This Snipping Tool or SnippingTool.exe is located in the System32 folder, but it (shortcut) can also be accessed via the following location:
C:\ProgramData\Microsoft\Windows\Start Menu\Programs\Accessories
However, if you have installed it from Microsoft Store, you may not able to able find the exact location. It doesn't matter as it will be instantly available with a shortcut or when you search in the Start menu.
Snipping Tool for Windows 11/10

How to use Snipping Tool in Windows 11/10

The Snipping Tool allows you to take four different types of screenshots:
- Free-form Snip lets you draw and captures any irregular part of the screen
- Rectangular Snip will allow you to drag the cursor around an object to form a rectangle
- Window Snip will let you select an open window, such as a browser window or dialog box, and let you capture it
- Full-screen snip will capture the entire screen when you select this type of snip.
Once you have changed the settings to your requirements, you can click on New or Ctrl+PrtnScr to take captures. This will only work when you set the Snipping tool as the default browser. Else you can invoke using Win + Shift + S.
TIP: When you capture a shot from a browser & save it as an HTML file, the URL appears below the snip. To prevent the URL from appearing, open Options and clear the Include URL below snips (HTML only) checkbox.
Lets us have a look at ways to use the Snipping Tool in Windows 11/10 effectively:
- Capture screenshots in Windows 11/10
- Win+PrntScr keyboard shortcut
- How to create Snipping Tool Shortcut
- Open Snipping Tool using Hotkey
- Snipping Tool Keyboard shortcuts
- Capture Context Menu using Snipping Tool
- Set Time delays for screen captures using Snipping Tool
- Capture part of the screen using Hotkey
- Disable white overlay.
This will work with every user account.
1] Capture screenshots in Windows 11/10
Search for Snipping Tool using the Taskbar Search icon and click on the result. The tool will open, and you will find yourself immediately on your desktop.
2] Win+PrntScr keyboard shortcut

Clicking on Win+PrntScr in Windows will let you capture the screenshot as per your settings. The image is automatically saved in your Pictures folder.
3] How to create Snipping Tool Shortcut
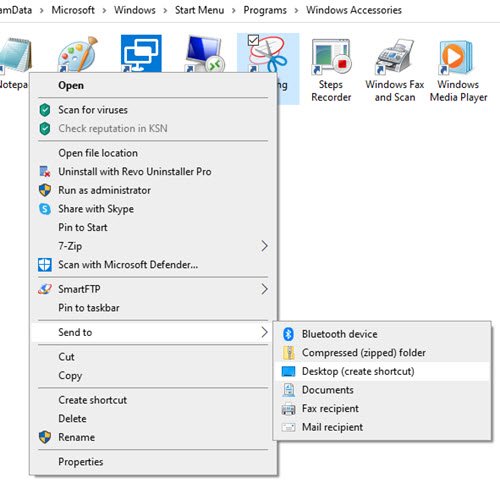
In Windows 10:
If you use it regularly, you can also create a Snipping Tool desktop shortcut to access it easily.
- Search for Snipping Tool using the Taskbar Search icon
- Right-click on the result and select Open file location
- In the folder that opens, locate Snipping Tool
- Right-click on it > Send to > Desktop
- The Snipping Tool shortcut will be created on your desktop.
4] Open Snipping Tool using Hotkey

If you are a frequent user of the Snipping Tool, you can create a hotkey for it. To do so, open the System32 folder and right-click on SnippingTool.exe (or on its shortcut in the Program/Accessories folder). Select Properties. Here, you can set a hotkey for it. I have, as an example, selected F5. So to open the snipping tool, all I have to do next time is press F5.
5] Snipping Tool Keyboard shortcuts
- Alt+M – Choose a snipping mode
- Alt+N – Create a new snip in the same mode as the last one
- Shift+Arrow keys – Move the cursor to select a rectangular snip area
- Alt+D – Delay capture by 1-5 seconds
- Ctrl+C – Copy the snip to the clipboard.
6] Capture Context Menu using Snipping Tool

If you wish to capture screenshots of your context menu, start Snipping Tool and click on Esc. Next, right-click on the desktop, file, or folder and then press Ctrl+PrntScr. This will let you capture the right-click context menu. You can also capture the start menu using this trick.
7] Set Time delays for screen captures using Snipping Tool

The new Snipping Tool menu in Windows 11/10 now lets you set up a 10-second delay to capture pop-up menus. Earlier it was available between 1 to 5 seconds, but not anymore.
8] Capture part of the screen using Hotkey
In Windows 10 and Windows 11 now, you can capture a part of your screen using a keyboard shortcut – WinKey+Shift+S. You can even create a desktop shortcut using the command snippingtool /clip in the Location box.
9] Disable white overlay
When the Snipping Tool is open and active, a white overlay appears. If you want to turn it off, you can do so via its Options. Uncheck the option to Show screen overlay when Snipping Tool is active.

To save the image, you have to click on the Save Snip button. An extra feature is that the full-screen shots are automatically saved in your Pictures folder.
If you wish to share a snip, you can click the Arrow on the Send Snip button and select an (email) option from the menu.

The Snipping Tool will not normally work on the start screen. You will be able only to capture the full start screen using the Win+PrntScr buttons and not a part of the start screen. If you click your allotted hotkey on the start screen, your windows will automatically switch to the desktop mode with the snipping tool opened. But there is a trick to do so, which we will see a bit later!
If you are aware of any more tips or tricks for the Snipping Tool, please share them in the comments section.
You may also want to check out our freeware Windows Screen Capture Tool that allows you to capture full screen, selected screen area, windows, webpages, and more. You can also add watermarks to your captured screenshot or edit the image using its basic image editor.
How to create Snipping Tool Shortcut?
Search for Snipping Tool using the Taskbar Search icon, Right-click on the result, and select Open file location; in the folder that opens, locate Snipping Tool, Right-click on it > Send to Desktop, The Snipping Tool shortcut will be created on your desktop.
What is the shortcut key for Snipping Tool?
The Snipping Tool Shortcuts for Screenshots is Win + Shift + S. It brings up the Snip & Sketch tool instantly. Then you can choose between the different selection areas offered by the Snip toolbar, i.e., freehand, rectangular, windows, or full screen. If you want to create a custom shortcut key, then you can create a new shortcut of the tool, and assign it a new hotkey.
How to open Snipping Tools options?
While the shortcut invokes the screenshot-taking tool, if you want to configure the option, you will need to search for it. So press the Start button, click on the search box and type Snipping tool to find it. Once it appears, launch the tool, and then you can configure options such as delay timer, default mode, etc.
Can I take a screenshot of streaming services?
Some of the streaming services such as Netflix will turn their screen black whenever someone tries to take a screenshot. However, services like Amazon Prime don't offer any restrictions.
UPDATE: Check out the new Microsoft Snip Screen Capture Tool.
How To Access Snipping Tool On Windows 10
Posted by: paytonthestive.blogspot.com
Source: https://www.thewindowsclub.com/snipping-tool-capture-screenshots-windows-8-tips
0 Response to "How To Access Snipping Tool On Windows 10"
Post a Comment